Are you building a B2B interactive experience targeting business users and looking to reject leads that enter personal email addresses?
Before We Begin
Before getting started, you will want to make sure you have a form that collects respondents’ email addresses. This form should be pointed toward a Thank You page. You will also want to remove the conversion point from your form to ensure only respondents who enter a work email address are identified as converted.
For this setup, we will also be using the data name “EmailAddress” to collect email addresses from respondents. In our example, we’ll create a data field called “Error” with an action on the rules.
Submit Button Rules
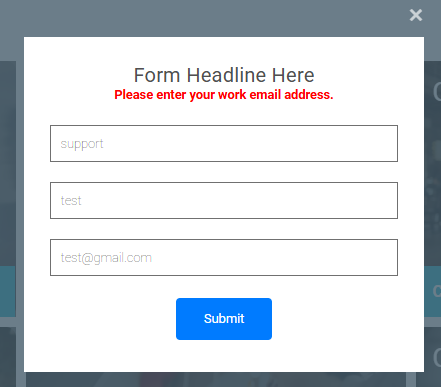
To edit your form’s advanced rules, click the form’s submit button select “Settings”, and then “Rules”. Next, you will add an advanced rule with one or more conditions that check for personal email addresses. In the example below, if a respondent enters an email that contains either “hotmail” or “gmail,” they will trigger two actions. The first action will create the data field “Error” and besides it, you can add the error message that will be displayed to the user (i.e. Please enter your work email address).
The second action will take respondents to the page they are currently on (i.e. gate form) instead of taking them to the Thank You page. The “Stop processing rules” action is also necessary to ensure any additional rules set up after this point are not triggered.
More specifically, if you immediately run an integration on form submission, you will want to make sure it is triggered after the personal email rule. Along with your integration rule, add a rule to “Mark as converted” so that only respondents who enter a work email address are exported and marked as converted.
Actions
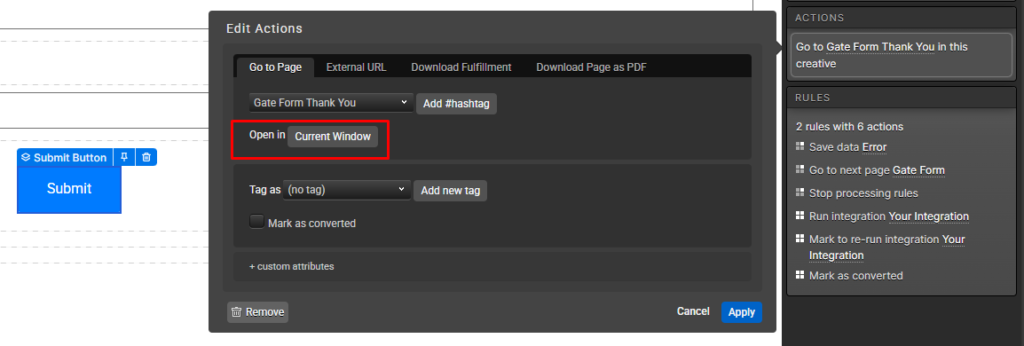
On your right-hand side, on the same settings tab, you’ll be able to set up the actions of that submit button. So in this case you will set it up to redirect the user to the thank you page, so if they enter a valid e-mail they will proceed to the next page as expected.

*NOTE: You may add as many conditions to the personal email rule to reject any additional personal email addresses as you like.
How to use in a lightbox
Setting the action of opening the content in the current window will generate a better user experience.
If they enter an invalid email, it will reload the content with the lightbox opened.
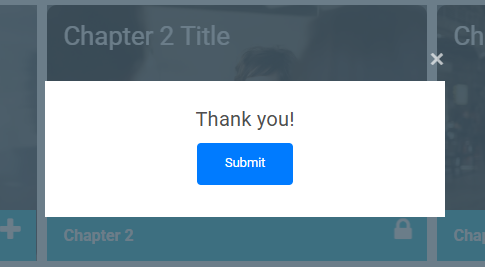
If they enter a valid e-mail it’ll redirect them to the next page where they’ll be able to go to the desired chapter.
Add Page Content
To complete this setup, you will use a content variable to display the error from your rules anywhere you would like on your page. In our example, we have added the {{Error}} content variable in the form header to display the error message. We have also made the text red using the Rich Text Editor.

With this setup complete, whenever a respondent enters a hotmail or gmail email address, they will see our personal email address error instead of going to the Thank You page.

Optional Rule
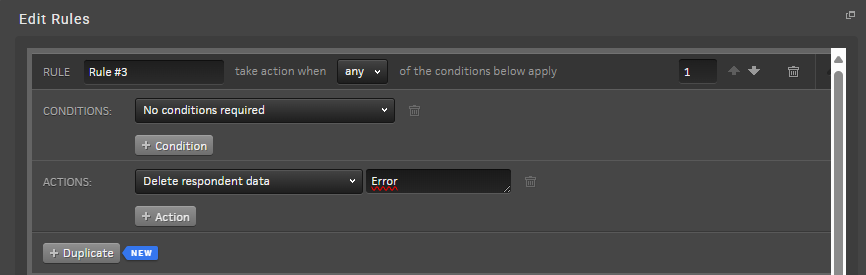
You can add a clean-up rule to remove the Error variable if it’s not needed anymore but if you won’t reuse that same variable it is ok to keep it as well.
You should add the rule Delete Error before you check the email, with that, you always know what the variable will contain, either the error when it fails or it simply doesn’t exist on success.
You can reuse the same variable somewhere else without it showing any unwanted text when you have succeeded, and if you were successful it will not potentially show an error if you get to see that form again.
If you have any questions, please contact us on [email protected].