Marketo: Get data via Marketo REST API
You can leverage Ion’s Get Lead integration with the Marketo REST API to optimize your Ion experiences. This integration enables you to retrieve data from Marketo based on a designated key. You can leverage Get Lead to pre-populate (or shorten) Ion forms, auto-segment respondents and for progressive profiling.
This document provides step-by-step instructions to set up a REST API integration with Marketo to get lead data. We’ll use the integration to pre-populate an Ion form in this document, but, as noted, there are a few different ways you can use Get Lead to enhance your Ion experiences.
Before we begin
There are few items you’ll need to roundup from Marketo prior to setting up the integration, listed below:
A web service needs to be created in Marketo in order to generate the REST API details. If needed, please contact Marketo support or check out their documentation for guidance in obtaining these items.
- Marketo Client ID
- Marketo Client Secret
- REST API Identity URL
There are few items you’ll need to have ready in Ion prior to setting up the integration, listed below:
Check out the “Before you begin” support post for guidance in creating these items.
- Create data collection fields that will store Marketo data
- Create Ion form(s)
- Set-up testing creative
Let’s Get Started!
1. Add Marketo account credentials to Ion
- Click the Integrations tab in your Ion console’s side nav
- Click “Set up account credentials” toward the top of the screen
- Under “Marketo”, click “New marketo credential”
- Add a friendly label for your account then enter your Marketo Client ID, Client Secret and REST API Identity URL
- Save
2. Create field mapping
Taking the steps below will enable you to extend a key value to Marketo and map the data points returned to their corresponding Ion data collection fields. To get started, add your new field mapping:
- Navigate into the Integrations screen
- Click green “New field mapping” button
- Label the field mapping and optionally add a description
- From the Integration type menu, select “Marketo REST”
- Save
3. Determine key to retrieve data and add as Outbound field
The outbound field you designate will be used as the key to retrieve data from Marketo. You can use email address, Marketo ID or the Marketo cookie as the key value. If you use Email Address or Marketo ID as the key, you will need to create an outbound field. If you plan to use the Marketo cookie, skip this step.
- Click green “New outbound field” button
- Select Data field from the Source drop-down
- Select the data field category then data collection field you’ll use as the key
- For email, select Contact Info > Email Address
- For Marketo ID, select the category and field you’ve created to store this value in Ion
- Make your field required to run the integration
- Select the corresponding Marketo field
- Save
4. Create Inbound fields
Inbound fields will map the data Marketo returns into their corresponding Ion data collection fields.
- Click green “New inbound field” button
- From the Target dropdown menus, selection the Ion data collection field you seek to populate with Marketo data
- To pre-populate Ion forms with Marketo data, be sure to select the data collection field used on your form
- From the Source dropdown, select the Marketo field you want to pull data from
- OR, select Javascript code if you want to transform the Marketo data prior to storing it in Ion data collection
- Use responseBody.marketo_field_name to access the Marketo field via Javascript
- Save
- Repeat these steps for each Marketo data field you seek to save into Ion data collection
5. Create integration
- Navigate back to Integrations screen
- Click into the Integrations tab
- Click green “New integration” button
- Enter label
- Optionally add a description
- Select the Field Mapping you’ve just created
- Skip Maximum retries
- Select Get Lead as the API method
- Select your Key field
- This is the field Marketo will use as the key to retrieve data
- Optionally add yourself to the debug distribution list for testing
- This will deliver an email to the designated address when the integration runs that displays the request and response from Marketo
- Check Only send error emails if you want to receive the debug email only when there is an error
6. Add integration to Ion pages
The Ion platform runs the integration based on rules you create. For Marketo Get Lead, the rule will typically run the integration at the page-level of the landing page. You can, however, run the integration on any actionable step in your Ion experience. The steps below walk through adding the rule at the page-level to populate an Ion form with Marketo data.
- Navigate into the testing creative with form that you set up prior to beginning the integration steps
- Under the Page tab in creative studio, click on +RULES
- Add the following rule:
- Condition: No conditions required
- Action: Run integration (select MKTO Get Lead integration)
- Save
7. Test integration
To test your integration, use the creative you’ve added the page-level rule to in the previous step. Please note, integrations do not run in Preview Mode, so you’ll want to open a URL for testing.
If using Email Address or Marketo ID as the key value, append the field name and value to the URL as a query string parameter. Be sure that the parameter name you append to the URL matches the “data name” of the Ion data collection field. If using the Marketo cookie as the key value, ensure the Marketo cookie is present prior to visiting the traffic source URL.
The integration will run when you visit the page. Ion form fields included in the field mapping will pre-populate with data retrieved from Marketo, if available.
If you’re on the debug email distribution list, you’ll receive an email that displays the request and response from Marketo.
Adding leads to Smart Campaigns
Ion’s powerful Marketo REST API integration enables you to automatically create/update Ion leads in Marketo. By default, leads get added to the Marketo database but you can easily integrate Ion leads with your Marketo Smart Campaigns!
This document outlines a few ways to funnel ion leads into Marketo Smart Campaigns but there might be other options that work best for you since your Marketo instance is unique to your organization. Feel free to ask your customer success manager for more information.
Before we begin
The first step to integrate Ion leads with Marketo Smart Campaigns is to create a Marketo add Lead integration in your Ion platform.
You’ll also need to be familiar with creating and editing Marketo Smart Campaign. For help with Smart Campaigns, check out the Marketo support post linked here.
Let’s get started
In Marketo, Smart Lists are used to define who should be added to a Smart Campaign. Triggers are used to add leads to a Smart List in real time. Below are three example triggers you can use to add ion leads to your Marketo Smart Campaigns.
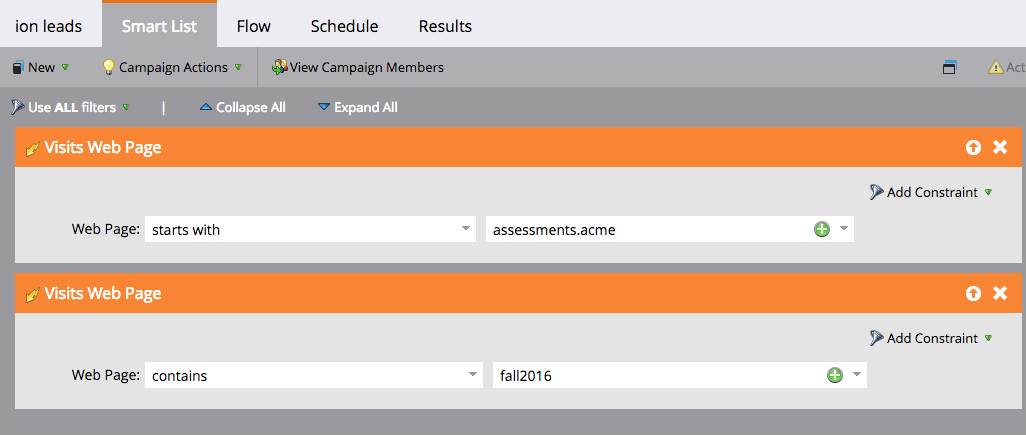
Visits Web Page
Adding Marketo Munchkin tracking script to your ion pages enables you to use Ion page URLs as a Smart List trigger. In Marketo, you can drag the Visits Web Page trigger into your Smart Campaign’s Smart List and paste an Ion URL, subdomain and/or keyword that is in each ion URL you seek to include.
The example triggers below would include leads created in Marketo that were generated from a page on the assements.acme subdomain that has the term fall2016 in the URL:
This step takes place in your Marketo instance
Data Value Changes with custom field as Attribute
You can add Ion leads to a Marketo Smart List using the Data Value Changes trigger. For example, you can create a REST API field in Marketo labeled SmartCampaign and a corresponding ion data field.
In Ion, the SmartCampaign field is added to the Marketo integration’s Field Mapping:

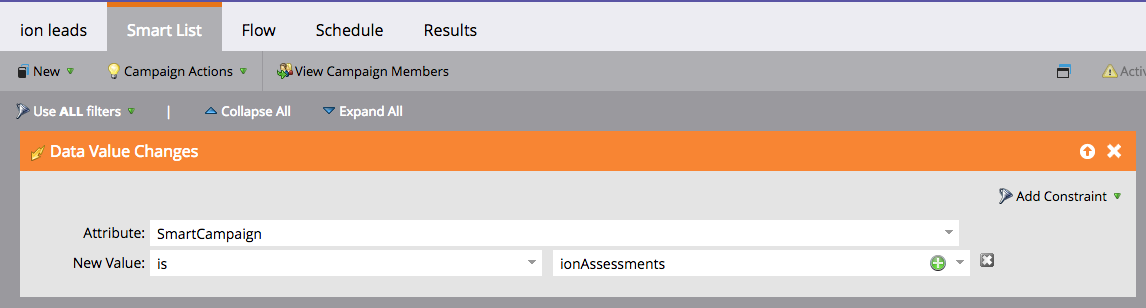
Rules are used on your ion pages to save the value you seek into the SmartCampaign Field:
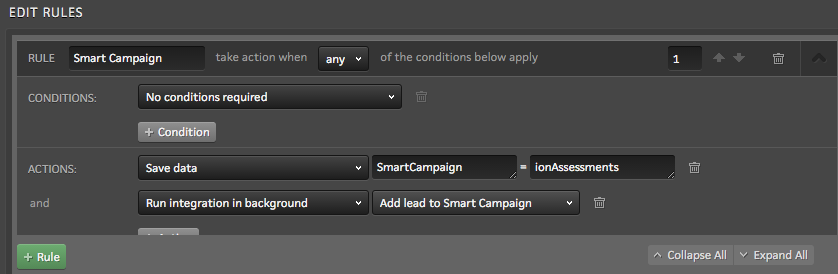
In Marketo, the Data Value Changes trigger is used to add leads to the desired Smart List:
This step takes place in your Marketo instance
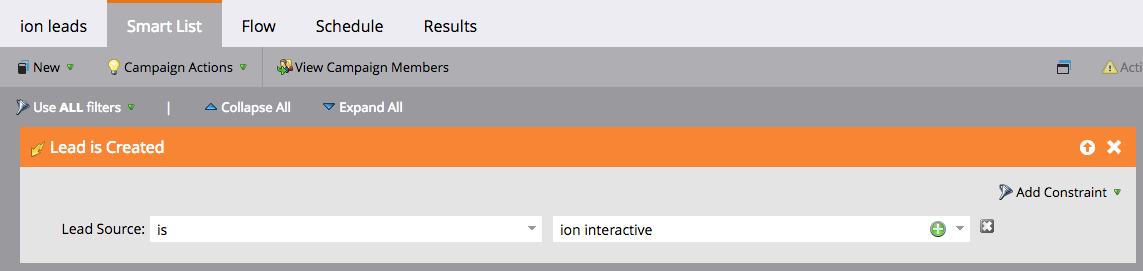
Lead is Created with Lead Source Constraint
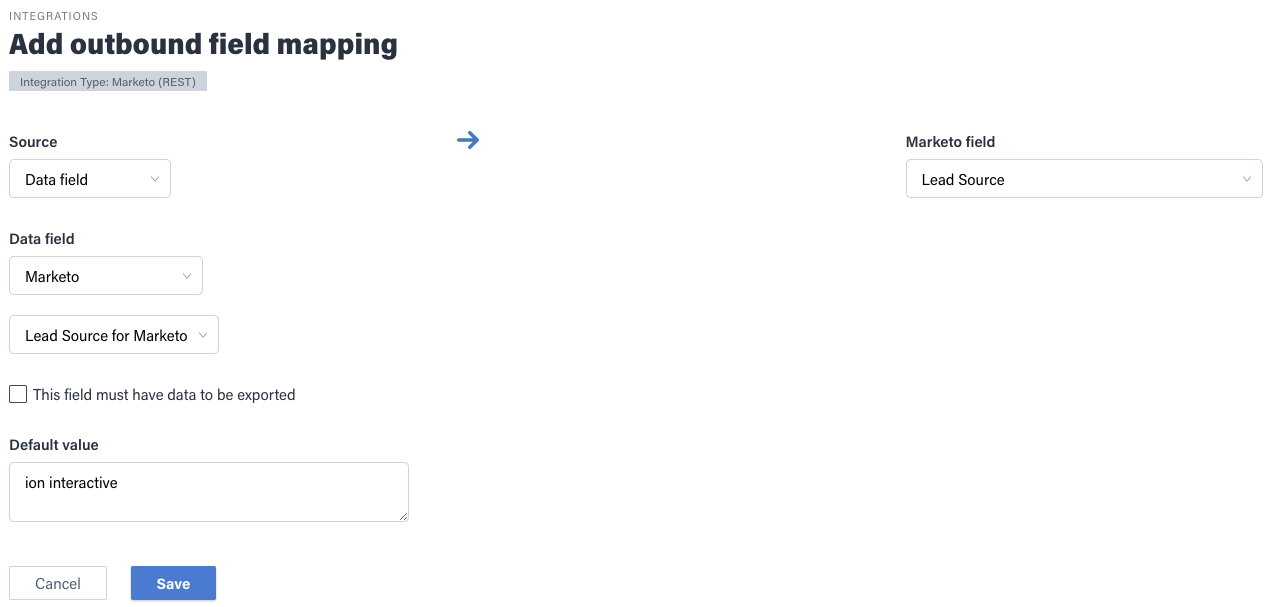
If you want to funnel all leads collected within your Ion console into a single Smart Campaign, you can leverage the Lead Source field. In your ion integration, Lead Source can be added to the Field Mapping with a default value:
In Marketo, you can use the Lead is Created trigger with Lead Source as the Constraint:
This step takes place in your Marketo instance
Nice work!
Once you’ve completed these steps, your integration is ready for use. You can add the rule to run the integration on all applicable creatives.
As noted, Marketo Get Lead can be used to accomplish other objectives. Here are some examples that can be accomplished using this integration and Ion’s Rules engine:
- Shorten or replace forms
- Auto-segment respondents
- Build progressive profiles
- Serve-up dynamic content based on Marketo data
- Export data
Feel free to reach out to our Support Team for assistance in leveraging this integration.