You have two integration methods to select from when exporting data from Ion to your HubSpot instance (also known as an “Add Lead” integration): the REST API method and the Post to Web Form method. Both methods can work seamlessly with your Ion creatives. The best method for you will depend on how you like to trigger automation in HubSpot.
HubSpot: Export Data Overview
REST API
Our native integration creates/updates contacts directly in your HubSpot contact table. This method often requires less effort to update or expand your integration in the future. However, it won’t trigger form processing steps or support creation of segments filtered on form completion, since it does not submit a HubSpot form.
Post to Web Form
A Post to Web Form integration is what it sounds like: data collected in Ion is posted to a form you’ve published in HubSpot. While the customer sees a form you built in Ion (and data is saved to your Ion console), HubSpot treats it like someone completed the HubSpot form directly.
This method often requires more effort to update or expand your integration in the future, as any changes must be made to both your ion integration and your HubSpot form(s). The benefits of this method are the ability to trigger automation in HubSpot based on form completion.
Embedded Form
A reusable HubSpot form widget can be created is used to insert any HubSpot form and alter the “thank you” page destination using variables in ion’s Creative Studio. The benefits of this method are the ability to use form completion to trigger advanced logic in HubSpot and the ability to leverage progressive profiling built in HubSpot. This can also be a good solution for companies with strict data security policies who do not want lead form data stored in ion for any period of time.
Check out the table below for a more detailed explanation of this method.
| HubSpot REST API | HubSpot Post to Web Form | Embedded HubSpot Form | |
| How does it work? | A connection is established between your ion console and your HubSpot instance. Next, a field mapping is completed in ion to define which ion fields should be exported and how they correspond to your HubSpot Contact record fields.
When the integration runs, a HubSpot Contact record will be created or updated (key: email address). |
A form is published in HubSpot to receive your ion data. Next, a field mapping is completed in ion to define which ion fields should be exported and where that data should be submitted in your HubSpot form. You can configure your integration to post to a single (“master”) HubSpot form for processing ion leads or leverage a dynamic destination to support posting to multiple HubSpot forms from a single ion integration.
When the integration runs, data collected in ion is re-posted to the designated HubSpot form. |
A reusable HubSpot form widget is created in your ion console’s Widget Library.
Once the widget is built, you can use your HubSpot Portal ID and Form ID values to insert any HubSpot form and alter the “thank you” page destination using variables in ion’s creative studio. Visitors will directly complete and submit HubSpot forms embedded in your ion creatives. |
| What kind of data can be sent to HubSpot? | All types of data can be seamlessly passed to a contact record in HubSpot. This includes Basic Lead Data, ion Core Data, data passed on the query string (like tracking parameters) and interaction data (like a calculator input or an assessment result).
Note: Integration services may be limited to certain data types. Check with your Customer Success Manager if you are unsure what you’ve purchased. |
All types of data can be seamlessly passed to a contact record in HubSpot. This includes Basic Lead Data, ion Core Data, data passed on the query string (like tracking parameters) and interaction data (like a calculator input or an assessment result).
Note: Integration services may be limited to certain data types. Check with your Customer Success Manager if you are unsure what you’ve purchased. |
Embedded forms work well when you are primarily concerned about passing data collected via form fill (in the HubSpot form itself). |
| What are my options to manage sensitive data? | Field-level security controls are available. The sensitive data expiration setting allows you to mark data in a given field for automatic deletion at a specific time interval (e.g. delete 72 hours after last contact). | Field-level security controls are available. The sensitive data expiration setting allows you to mark data in a given field for automatic deletion at a specific time interval (e.g. delete 72 hours after last contact). | Data collected via the form is stored in HubSpot only, according to your instance’s configuration. |
| How will I build the form my visitors will see?
Can I change the styling? |
You will use ion’s form building components. This gives you maximum control of the look, feel and flow of your form experience and allows you to leverage the branded theme built for you in ion. | You will use ion’s form building components. This gives you maximum control of the look, feel and flow of your form experience and allows you to leverage the branded theme built for you in ion. | Forms are built directly in HubSpot and any edits you make (e.g. adding a new field) will be reflected in your ion creative.
Form styling is mainly controlled in HubSpot and can be updated directly in HubSpot. It is also possible to override some styles by leveraging custom code in ion. |
| Can my forms be pre-populated with known lead data? | Forms can be pre-populated based on ion data or (if a Get Lead integration is set up) based on HubSpot + ion data.
Note: Integration services may not include a Get Lead integration. Check with your Customer Success Manager if you are unsure what you’ve purchased. |
Forms can be pre-populated based on ion data or (if a Get Lead integration is set up) based on HubSpot + ion data.
Note: Integration services may not include a Get Lead integration. Check with your Customer Success Manager if you are unsure what you’ve purchased. |
HubSpot forms can use HubSpot cookies to recognize visitors who have submitted specific forms which allow you to utilize HubSpot’s progressive profiling form field feature to show new fields based on data previously collected within that form. |
| How often are my leads sent to HubSpot? | Leads are immediately sent to HubSpot each time the integration runs. Most ion users apply their integration to run on the submission of a form in their ion creative. | Leads are immediately sent to HubSpot each time the integration runs. Most ion users apply their integration to run on the submission of a form in their ion creative. | Leads are immediately sent to HubSpot upon form submission. |
| What happens if there is a HubSpot service interruption? | Visitors will still be able to submit forms and form data will be saved according to your configuration in ion. We’ll retry the post once per hour until successful, up to the maximum number set in your integration (default: 50 retries). | Visitors will still be able to submit forms and form data will be saved according to your configuration in ion. We’ll retry the post once per hour until successful, up to the maximum number set in your integration (default: 50 retries). | In the event of a HubSpot service interruption, visitors will be unable to submit forms and no form data will be collected. |
HubSpot: Get data via HubSpot REST API
You can leverage Ion’s Get Lead integration with the HubSpot REST API to optimize your Ion experiences. This integration enables you to retrieve data from HubSpot based on a respondent’s email address. You can leverage Get Lead to pre-populate (or shorten) Ion forms, auto-segment respondents and for progressive profiling.
This document provides step-by-step instructions to set up a REST API integration with HubSpot to get lead data. We’ll use the integration to pre-populate an Ion form in this document, but, as noted, there are a few different ways you can use Get Lead to enhance your ion experiences.
Before we begin
There are few items you’ll need to have ready in Ion prior to setting up the integration, listed below:
Check out the “Before you begin” support post for guidance in creating these items.
- Create data collection fields that will store HubSpot data
- Create Ion form(s)
- Set-up testing creative
Let’s Get Started!
1. Add HubSpot account credentials to Ion
- Click the Integrations tab in your Ion console’s side nav
- Click “Set up account credentials” toward the top of the screen
- Under “HubSpot”, click “New HubSpot credential”
- Add a friendly label for your account
- Save
- You will be redirected to HubSpot to authenticate your credentials
- After signing into HubSpot, click the Grant access button to allow the Ion platform to access your HubSpot account
- After granting access, you will be returned to your Ion console.
2. Create field mapping
Taking the steps below will enable you to extend an email address value to HubSpot and map the data points returned to their corresponding ion data collection fields. To get started, add your new field mapping:
- Navigate back to the Integrations screen
- Click the green “New field mapping” button
- Label the field mapping and optionally add a description
- From the Integration type menu, select “HubSpot”
- Save
3. Add Email Address as the Outbound field
The email address value will be used as the key to retrieve data from HubSpot.
- Click the green “New outbound field” button
- Select the Data field from the Source drop-down
- Select Contact Info > Email Address
- Make the field required for the integration to run
- Select the corresponding HubSpot Email Address field
- Save
4. Create Inbound fields
Inbound fields will map the data HubSpot returns into their corresponding Ion data collection fields.
- Click the green “New inbound field” button
- From the Target dropdown menus, select the Ion data collection field you seek to populate with HubSpot data
- To pre-populate Ion forms with HubSpot data, be sure to select the data collection field used on your form
- From the Source dropdown, select the HubSpot field you want to pull data from
- OR, select Javascript code if you want to transform the HubSpot data prior to storing it in ion data collection
- Use responseBody.hubspot_field_name to access the HubSpot field via Javascript
- Save
- Repeat these steps for each HubSpot data field you seek to save into ion data collection
5. Create integration
- Navigate back to the Integrations screen
- Click into the Integrations tab
- Click the green “New integration” button
- Enter label
- Optionally add a description
- Select the Field Mapping you’ve just created
- Skip Maximum retries
- Select Get Lead as the API method
- Select the outbound Email Address field
- Optionally add yourself to the debug distribution list for testing
- This will deliver an email to the designated address when the integration runs that displays the request and response from HubSpot
- Check Only send error emails if you want to receive the debug email only when there is an error
6. Add integration to ion pages
The Ion platform runs the integration based on the rules you create. For HubSpot Get Lead, the rule will typically run the integration at the page-level of the landing page. You can, however, run the integration on any actionable step in your Ion experience. The steps below walk through adding the rule at the page-level to populate an ion form with HubSpot data.
- Navigate into the testing creative with a form that you set up prior to beginning the integration steps
- Under the Page tab in creative studio, click on +RULES
- Add the following rule:
- Condition: No conditions required
- Action: Run integration (select HubSpot Get Lead integration)
- Save
7. Test integration
Please note, integrations do not run in Preview Mode, so you’ll want to open a URL for your testing creative. Either pass an email address into your Ion page on the query string or submit your initial form that collects the email address. If passing an email address into Ion on the query string, be sure that the parameter name you append to the URL matches the “data name” of the Ion data collection field selected as the outbound field in your Field Mapping.
Once the integration runs, the form you seek to pre-populate will display the data retrieved from HubSpot. If you’re on the debug email distribution list, you’ll receive an email that displays the request and response from HubSpot.
Nice work!
Once you’ve completed these steps, your integration is ready for use. You can add the rule to run the integration on all applicable creatives.
As noted, HubSpot Get Lead can be used to accomplish other objectives. Here are some examples that can be accomplished using this integration and ion’s Rules engine:
- Shorten or replace forms
- Auto-segment respondents
- Build progressive profiles
- Serve-up dynamic content based on HubSpot data
Feel free to reach out to our Support team for assistance in leveraging this integration.
HubSpot: Post data to HubSpot form
Data collected through your Ion experiences can be submitted to a HubSpot form by leveraging ion’s ‘post to web form’ integration. This document provides step-by-step instructions to create an integration that posts data to a HubSpot form. Be sure to check out the Advanced Options section of this article to learn about posting to multiple HubSpot forms, including valuable dialogue data and the HubSpot tracking cookie.
Click here if you want to check out the advanced Integration options!
Before We Begin
There are few items you’ll need to roundup from HubSpot prior to setting up the integration. The HubSpot support document linked here provides further information around the items noted below:
- HubSpot form field names
- HubSpot form GUID
- HubSpot endpoint URL
There are a few steps to take in the Ion platform before setting up the integration. The Before You Begin support document linked here provides more information on the items listed below:
- Create data collection fields
- Create Ion form(s)
- Set-up testing creative
Let’s get started!
1. Create field mapping
Taking the steps below will map your Ion data collection fields to their corresponding HubSpot field names. To get started, add your new field mapping:
- Click the Integrations tab within your Ion console’s side nav
- Click green “New field mapping” button
- Label the field mapping “HubSpot” and optionally add a description
- From the Integration type menu, select “Post to Web Form”
- Save
2. Add Outbound fields to field mapping
Outbound fields define the data you extend from Ion to your HubSpot web form.
- Click the green “New outbound field” button to add a new field to your field mapping
- When adding a new field, you will either select from the Data Collection drop-down menus, Core Field drop-down menu, implement a mashup template or add a field via JavaScript
- To add a form field, use the Data Collection drop-down menus to select the data field category then the data collection field
- OR, to add an Ion Core field, select from the Core Field drop-down menu
- OR, to export multiple ion fields to one external field, pick Mashup and plug inside {% raw %} {{DataName}} {% endraw %} {% raw %} {{DataName2}} {% endraw %}, etc. into the editor
- OR, to reformat a value prior to export, use the JavaScript field to add logic around the value collected in ion. To access data collection fields via Javascript, use respondent.dataname.
- Optionally make your field required to run the integration
- Optionally add a default value
- Enter the external field name
- Save
- Repeat these steps for each field that should be included in the Field Mapping
- Skip inbound fields
Some of your lead data will be automatically sent by Ion and saved as properties of the new contact created in Hubspot. This means it is not necessary to add extra fields to either instances to collect the following data:
– Date of Conversion
– Traffic Origin
– Number of visits from this contact to this Form
– First Conversion Form from this contact
– User’s IP Address (City, Country and Region)
Other data can also be sent and saved as properties. This will depend on what information Hubspot is able to identify on its pages. For the complete list, see the properties tied to the contacts that converted in your Ion integrated Forms.
3. Create integration
- Navigate back to the Integrations screen
- Click into the Integrations tab
- Click the green “New integration” button
- Enter “Post to HubSpot” as the label
- Optionally add a description
- Select the Field Mapping you’ve just created
- Paste your Form URL into the editor
- https://forms.hubspot.com/uploads/form/v2/:portal_id/:form_guid
- https://forms.hubspot.com/uploads/form/v2/:portal_id/:form_guid
- This is the HubSpot form URL which needs to be configured like so:
- https://forms.hubspot.com/uploads/form/v2/999999/abcd1234abcd1234abcd1234abcd1234
- https://forms.hubspot.com/uploads/form/v2/999999/abcd1234abcd1234abcd1234abcd1234
- Set maximum retries
- If there is a service interruption with the external platform, ion will retry the post on the top of the hour for as many retries as you indicate here.
- Check “Empty Fields” to exclude external fields that do not have values from the POST data
- Select POST as the method
- Optionally add Debug email address
- Email addresses specified here will receive an email each time the integration runs that displays the data posted and the response received. This is typically only used for testing and troubleshooting.
- Skip Save Response As, Authentication and custom headers
- Save
4. Add integration to ion pages
The Ion platform runs the integration based on the rules you create. Rules can be added to any actionable item in your Ion creative. Integration rules are typically run at the form-level, upon form submission, or on an assessment step. Follow the steps below to add the integration to your Ion pages.
- Navigate into the creative
- Click on the form, button or link you seek to make the trigger to run your integration
- In Creative Studio, click on +rules
- Select the condition that needs to be met to run the integration
- “No conditions required” is typically used
- Select “Run integration in background” as the action
- Save
5. Test integration
Use the creative you set up prior to beginning the integration steps to test your integration. Please note, integrations do not run in Preview Mode so you’ll want to open a URL for testing. The integration will run once you submit the Ion form, or complete the action that runs the integration rule. If you’re on the debug email distribution list, you’ll receive an email that displays the data posted and response from the external server. You’ll also want to check that the data you submitted was received by the external platform.
Advanced Options
Post to multiple HubSpot forms
If you seek to post Ion leads to campaign-specific HubSpot forms, there are two routes you can select from to accomplish this objective:
1. Make the HubSpot endpoint URL dynamic, supported by a form rule that saves the Form GUID
In the Ion integration, replace the GUID on the endpoint with a dynamic placeholder, like so: https://forms.hubspot.com/uploads/form/v2/:portal_id/{% raw %}{{HubFormGUID}} {% endraw %}
Above the form-level rule action that runs the integration, save the GUID value:
Condition: No conditions required
Action: Save data – HubFormGUID = paste GUID value here
2. Create new integration for each HubSpot form
Instead of leveraging a dynamic endpoint, you can create a new integration for each HubSpot form you seek to post to. Given that the HubSpot field names are consistent, you can leverage the same field mapping for each integration, and just paste a new endpoint into +Integration.
Include Dialogue Data in post
Data collected outside of your Ion forms can be included in the post to HubSpot. Results generated through rule calculations, Ion Core Fields and query string parameters are examples of supplemental data points that can be included in the post to HubSpot. As long as these data points are available when the integration runs, they can be included to enhance the contact record! To accomplish this, create fields to receive the desired data points on your HubSpot form(s) and include them in the Ion field mapping.
Add HubSpot lead activity tracking
In order to associate analytics metrics with a contact record in HubSpot, you’ll need to add your HubSpot tracking code to your Ion form pages and include a special field called HS Context in the post. HS Context is a JSON formatted block that contains contextual information for the form submission, including the HubSpot tracking cookie token value, the IP Address of the lead converting, the URL the form is submitted on, and the name of the page the form is submitted on.
1. Add your HubSpot tracking code to ion’s script library
- Navigate to the script library (Libraries > Scripts)
- Click the green “New script category” button and create a category named HubSpot (or navigate into existing script category)
- Click the green “New script” button, label your new script Visitor Tracking, paste in the HubSpot tracking code, and save
2. Add the server scriptlet that saves the HS Context value
- Navigate to the server scriptlet library (Libraries > Server Scriptlets)
- Click the green “New scriptlet category” button and create a category named HubSpot
- Click the green “New scriptlet” button, label your new scriptlet Save HS Context, and paste the following into the scriptlet editor:
| var hutk = actionReadCookie(“hubspotutk”);actionSaveData(“hutk”,hutk); var ip = respondent.ipaddress;var tsurl = respondent.deeplinkurl;var pname = respondent.pagelabel; var hscontext = {“hutk”:hutk,”ipAddress”:ip,”pageUrl”:tsurl, “pageName”:pname}; var hub = JSON.stringify(hscontext); actionSaveData(“hscontext”,hub); |
3. Update your integration’s field mapping to include the HS Context value as an outbound field
- Navigate to the integration field mapping (Integrations > Field Mappings > [Your Field Mapping])
- Click green “New outbound field” and create a new outbound field that uses {% raw %} {{hscontext}} {% endraw %} in the mashup template field option and External Field hs_context
- Save
4. Add your HubSpot Visitor Tracking script to your testing creative
- Navigate to the Creative Management screen for your creative
- Click “Edit creative properties” button on the right side of the Creative Management screen
- From the Creative-wide </body> library script editor, select HubSpot as the category and Visitor Tracking as the script from the dropdown menus
- Save
5. Add the HubSpot Save HS Context scriptlet to your testing creative
- Navigate to the form page in the creative studio
- Find your form-level rules and add an action to your integration rule that runs the Save HS Context server scriptlet before the HubSpot integration
- Conditions: No conditions required
- Action: Run server scriptlet – HubSpot/Save HS Context
- Action: Run integration in background – Post to HubSpot
Note: You can run the integration from the scriptlet instead, if you seek to reduce the amount of rule actions. When using this method, select “Run server scriptlet” as your rule action and remove the “Run integration in background” action. Modifications to the scriptlet are required.
Nice work!
Once you’ve completed these steps, your integration is ready for use. You can add the rule to run the integration on all applicable creatives. If you run into any questions, please reach out to our Support team.
HubSpot: Embed HubSpot forms in Ion
If you’d like to embed HubSpot forms into your ion experiences, check out this post to easily repurpose your HubSpot embed code into a reusable ion widget. Taking these steps will enable you to redirect respondents to an ion page after form submission and to add ion rule logic to your HubSpot forms.
Before we begin
Before setting up a HubSpot form widget in ion, you will want to understand where to find your HubSpot portal ID and the form ID of the HubSpot form(s) you want to add to your ion pages.
Your HubSpot portal ID is a numeric value that is always present in the URL of every page within your HubSpot account. For example, when reviewing contacts in your HubSpot account, your URL should look something like the below. In this example, we’ve made the portal ID bold to make it easy to identify the portal ID.
You’ll also need to understand where to find your form IDs. The form ID is a longer alpha-numeric string that you will see in the URL when editing your HubSpot form or viewing form performance in HubSpot. Please find examples below of URLs you will see in your address bar when editing a HubSpot form or viewing performance with the form ID bold.
Edit Form:
Form Performance:
Let’s get started
Now that you know where to find your HubSpot portal ID and form ID values, we can start working on the form widget in ion. You can put your portal ID and form ID values to the side for now until it’s time to add your HubSpot form widget to a page.
Add widget code to your ion library
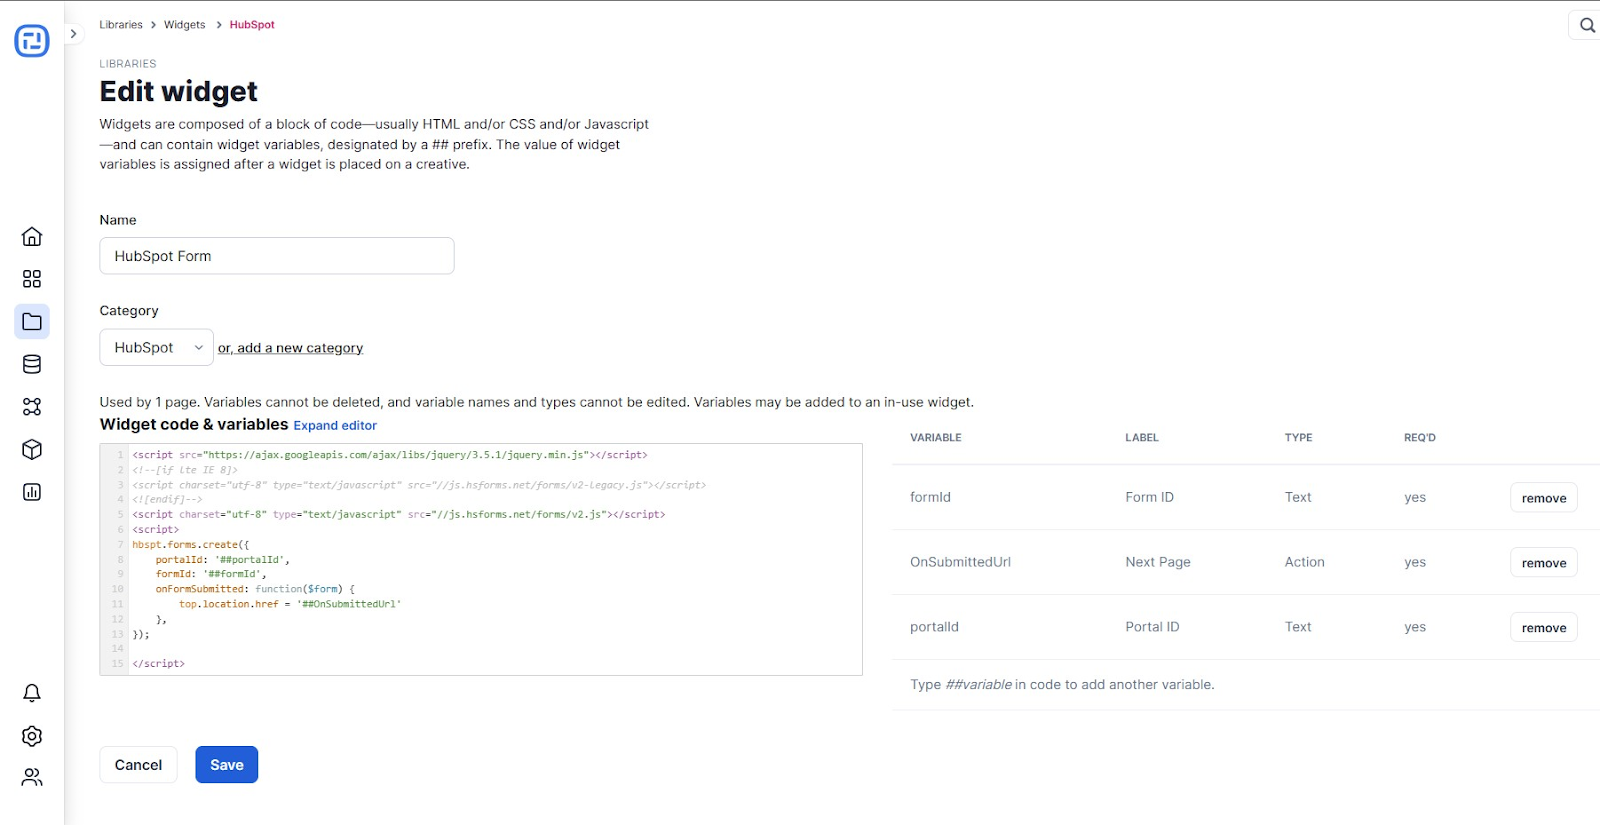
The first step in ion is to add the below code to your ion Widget Library.
In ion, navigate to Libraries > Widgets and click the New widget button to add a new widget. We recommend labeling the widget something like Embed Form and storing it in a category called HubSpot.
Next, paste the widget code below into the editor.
<script src=”https://ajax.googleapis.com/ajax/libs/jquery/3.5.1/jquery.min.js”></script>
<!–[if lte IE 8]>
<script charset=”utf-8″ type=”text/javascript” src=”//js.hsforms.net/forms/v2-legacy.js”></script>
<![endif]–>
<script charset=”utf-8″ type=”text/javascript” src=”//js.hsforms.net/forms/v2.js”></script>
<script>
hbspt.forms.create({
portalId: ‘##portalId’,
formId: ‘##formId’,
onFormSubmitted: function($form) {
top.location.href = ‘##OnSubmittedUrl’
},
});
</script>
This code includes variables that you will be able to populate with your portal ID and form ID when the time comes to add it to your page. It also includes a variable that will allow you to specify what page to go to when the form is submitted.
Before saving, go ahead and set the Portal ID and Form ID as required text and Next Page as a required action, like the example below:
Add the widget to your ion experience
Navigate to the page where you’d like to embed the HubSpot form. Drag the Widget icon from the Basics palette onto your page and select your new HubSpot > Embed Form widget. Next, under Variables in Creative studio, enter the portal ID and form ID, in the Source text option, from your HubSpot account and select the ion page you seek to redirect to.
Voila! Your HubSpot form is now embedded in your ion experience! You can even add ion rule logic to your HubSpot form.